

Using a HackTheBox seasonal machine (danglingtree.htb) as the running case study, because toy data teaches tools, but real (lab) data teaches lessons.
First of all a big welcome or welcome back for the returning readers and thankyou for the time Ive been wondering and finally i had to write this detailed blog on how to use bloodhound because most people,lets be honest dont know how to but bloodhound is one of the most visually easy tools in active directory to use so without much ado lets get into it.
(cheers)
What you will learn in this post
- How BloodHound CE works under the hood: collectors, the graph database, and the web UI
- How to install BloodHound Community Edition on Kali Linux step by step
- How to collect Active Directory data with bloodhound-python and what every collection method actually does
- How to read the collector JSON format directly (users, computers, groups, ACLs, sessions)
- A full click-by-click graph analysis walkthrough with screenshots: login, node search, the node panel, pathfinding, custom Cypher
- The single most common BloodHound gotcha in 2026: legacy collectors versus BloodHound CE ingestion
- How to rebuild BloodHound’s shortest-path logic in about 150 lines of Python
- How blue teams use the exact same graph defensively
Everything below was done against an authorized HTB lab machine and my own local BloodHound install. Passwords and flags from the box are deliberately omitted.
1. How BloodHound actually works
💡 BloodHound is a free, open-source tool (by SpecterOps) that maps Active Directory as a network of “who can control what” relationships, then finds attack paths through it. Active Directory (AD) is Microsoft’s directory service - the database of users, computers, and groups that almost every corporate Windows network uses for logins and permissions. When attackers say “we own the domain”, they mean they reached the most privileged accounts in AD.
BloodHound is three components and a lot of glue:
What each piece is, in one breath:
- A collector is a small program that logs into the network as any normal domain user and asks “who exists, who is in which group, who has which rights?” - no admin privileges needed, which is exactly what makes it so effective.
- LDAP, SMB, RPC are the three Windows network protocols the collector speaks: LDAP queries the directory (“list all users”), SMB talks to file shares and services on machines, RPC asks machines who is currently logged in.
- The graph database stores that data as nodes (things) and edges (relationships) instead of tables. On Kali that database is Neo4j.
- Cypher is the query language for graph databases - think “SQL, but for nodes and edges instead of rows”.
MATCH (u:User) RETURN umeans “find every node labelled User and show it to me”.
The mental model that matters: a BloodHound “attack path” is nothing magical. It is a graph where:
- nodes are AD objects (User, Group, Computer, Domain, OU, GPO, Container, plus ADCS nodes like CertTemplate and EnterpriseCA, and Azure nodes in the AZ* family), and
- edges are abusable relationships:
MemberOf,AdminTo,CanRDP,HasSession,GenericAll,WriteDacl,ForceChangePassword,DCSync,ADCSESC1, and more.
💡 Reading the edge names:
MemberOf= “is in this group”,AdminTo= “has admin rights on this computer”,CanRDP= “can remote-desktop into it”,HasSession= “is currently logged in there” (so their credentials may be extractable from that machine’s memory),GenericAll= “full control over the object”,WriteDacl= “can rewrite who is allowed to do what to it”,ForceChangePassword= “can set a new password for it”,DCSync= “can ask the domain controller to hand over all password hashes, the closest thing to owning the domain”.
Find a path of traversable edges from a node you control to a node you want, and you have an attack plan. BloodHound is “just” shortest-path search (BFS / variable-length Cypher) over that graph plus a large library of saved queries.
💡 BFS (breadth-first search) is the classic “explore everything one hop away, then two hops, then three” algorithm - the same way a ripple spreads on water. The first time it reaches the target, it has found a shortest path. That is literally the whole “attack path engine”.
A note on versions (this bit me, it will bite you)
There are two BloodHounds:
- Legacy BloodHound (final release 4.3.1, 2023), archived and unmaintained at SpecterOps/BloodHound-Legacy.
- BloodHound CE (SpecterOps/BloodHound, Apache-2.0), the actively developed one. Current stable is v9.6.0 (August 2026); Kali’s
bloodhoundpackage tracks it almost verbatim (9.6.0-0kali1).
Two architectural footnotes worth knowing in 2026:
- Upstream CE 8.x/9.x has been migrating the graph layer off Neo4j onto PostgreSQL via SpecterOps’ DAWGS library, which translates an openCypher subset (“CySQL”) into SQL. The upstream docs no longer mention Neo4j. However, Kali’s packaging (used throughout this post, installed via
apt install bloodhound neo4j) still runs the classic dual-database stack: PostgreSQL for application state, Neo4j onbolt://localhost:7687for the graph. If you deploy CE with the officialbloodhound-cli/Docker instead, you get the Postgres-only stack: the Cypher you write is the same, but there is nocypher-shellto poke at. - CE’s analysis engine post-processes raw collector edges into 37 composite edges. For example,
DCSyncis synthesized when a principal has bothGetChangesandGetChangesAll, and the ADCS ESC edges are derived from certificate template properties. The raw JSON does not contain the string “DCSync” anywhere; the graph database does.
2. Setting up BloodHound CE on Kali Linux
sudo apt install -y bloodhound neo4j
sudo bloodhound-setup     # creates the postgres DB, starts neo4j, opens :7474
What those two commands do:
apt install -y bloodhound neo4j- installs the BloodHound CE web app and Neo4j (the graph database it stores your data in). The-yjust answers “yes” to the install prompts automatically.bloodhound-setup- one-time initialization: it creates BloodHound’s application database (PostgreSQL), enables and starts the Neo4j service, and openshttp://localhost:7474in your browser so you can set the Neo4j password. You only ever run this once.
bloodhound-setup leaves the Neo4j password at its default. Change it at http://localhost:7474: connect as neo4j/neo4j, and the Neo4j browser forces a password change. Then put the new password into /etc/bhapi/bhapi.json:
{
  "database": {
    "addr": "localhost:5432",
    "username": "_bloodhound",
    "secret": "bloodhound",
    "database": "bloodhound"
  },
  "neo4j": {
    "addr": "localhost:7687",
    "username": "neo4j",
    "secret": "<your-new-neo4j-password>"
  },
  "default_admin": {
    "principal_name": "admin",
    "password": "admin"
  }
}
This file is BloodHound’s configuration: the database block is where the app keeps its own state (users, ingest jobs), the neo4j block is the login for the graph database, and default_admin is the account you will use to log into the web UI.
Then sudo bloodhound-start brings up the web UI at http://127.0.0.1:8080.

What bloodhound-start does, in order: it starts the Neo4j database server (available at localhost:7474 for the browser, bolt://localhost:7687 for BloodHound), then starts the BloodHound web service, and prints the UI address plus the default login (admin/admin - change it from the Profile page after your first login).
Stopping BloodHound when you are done
BloodHound and Neo4j keep running in the background after you close the browser tab. When you are finished working, shut them down so they are not sitting there eating memory (and so nothing is listening on :8080 the next time you are on a hostile network):
sudo bloodhound-stop
bloodhound-stop is the mirror of start: it stops the BloodHound web service and then Neo4j, and prints the final service status so you can confirm both actually went down. Your collected data is not lost - it lives in the databases on disk and comes back on the next bloodhound-start.
Logging in
The first thing every user sees, and the first screenshot of our walkthrough: the BloodHound CE login screen.
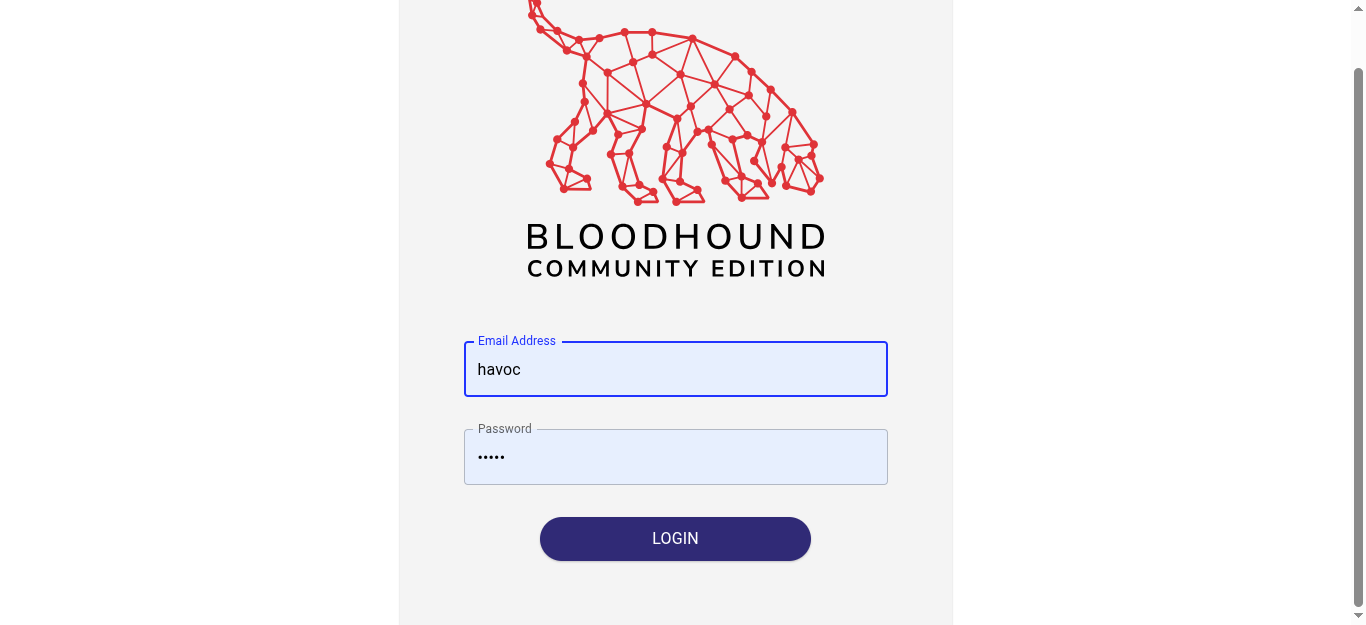
Enter your admin credentials (the ones you configured in bhapi.json or created during setup):
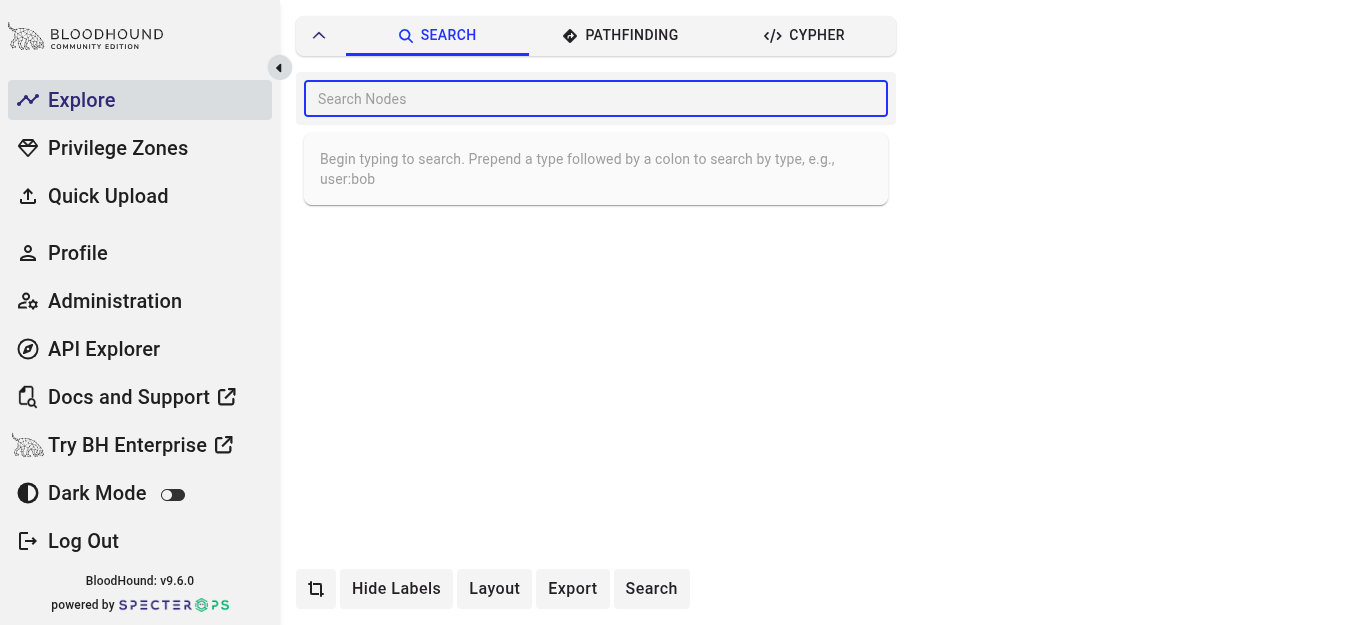
Click LOGIN and you land on the Explore page, the main analysis workspace. Note the left navigation: Explore, Privilege Zones, Quick Upload, Profile, Administration, API Explorer, plus the version string at the bottom (v9.6.0 here).
3. Collecting Active Directory data
The collection command
Early on the box, after getting first credentials (anderson.w, a contractor account), I collected with the Linux ingestor:
bloodhound-python -u anderson.w -p '<redacted>' \
    -d danglingtree.htb -dc dc.danglingtree.htb \
    -ns 10.129.11.209 -c All --zip
Every flag, so you know what you are actually asking the network for:
| Flag | Value here | What it does |
|---|---|---|
-u / -p | anderson.w / password | The credentials to authenticate with. Any normal, low-privilege domain account works - that is the point of the tool: a regular user can map the whole domain’s relationships. |
-d | danglingtree.htb | The domain (its DNS name). Tells the collector which directory to enumerate. |
-dc | dc.danglingtree.htb | The domain controller - the server that holds the directory. This is who we send LDAP queries to. |
-ns | 10.129.11.209 | The DNS nameserver to resolve names against (on HTB, the DC itself). Point this at a host that can resolve the domain’s internal names. |
-c | All | The collection method - how much data to pull, and how loud to be (see the table below). |
--zip | - | Bundle the resulting JSON files into one zip, ready to drag into BloodHound. |
Collection methods are an OPSEC dial
💡 OPSEC (operations security) is attacker-speak for “how likely is the blue team to notice what I am doing”. Every extra protocol the collector speaks is another log line on a defender’s dashboard somewhere. Choose the quietest method that answers your current question.
The -c flag is worth internalizing, because it is a loudness/coverage dial:
| Method | What it collects | OPSEC |
|---|---|---|
DCOnly | everything from LDAP on the DC only: users, groups, ACLs, trusts, GPOs | quietest; no computer logins |
Default | DCOnly + local group membership and sessions from member computers | moderate |
All | Default + RDP/DCOM/PSRemote local groups, object props, ACLs everywhere | loudest |
LoggedOn | aggressively enumerates logged-on sessions (needs admin on targets) | very loud, often incomplete |
The official docs’ advice (“prefer DCOnly whenever possible”) is sound: an engagement’s first collection should almost always be DCOnly, then targeted re-collection as you compromise more privileged accounts.
Other ways to run a collection
bloodhound-python is not the only door in. Two alternatives cover the situations it does not:
NetExec (formerly CrackMapExec) wraps SharpHound for you - handy when you already have valid credentials and want enumeration and collection in one pass:
nxc ldap 10.129.11.209 -u anderson.w -p '<password>' \
    --bloodhound --collection All --dns-server 10.129.11.209
nxc ldap speaks to the domain controller over LDAP (the same protocol the standalone collector uses), --bloodhound triggers the embedded SharpHound ingestion, and the resulting zip lands under ~/.nxc/logs/ (as root: /root/.nxc/logs/) ready for upload. Because SharpHound is CE-native, this route also sidesteps the legacy-collector gotcha of section 6.
Metasploit’s post-exploitation module covers the case where you already have a shell on a Windows box in the domain:
use post/windows/gather/bloodhound
set SESSION <id>
run
It uploads and runs SharpHound on the compromised host and brings the zip back over the existing session. Same output, different vantage point - which, as section 8 argues, is the whole game.
What the collector actually emits
Unzip the output and you get one JSON file per node type:
💡 JSON is just a text format for structured data:
{ "key": "value" }pairs and lists. Every tool in this post can read it, which is why we can slice the collector’s output withjq(a tiny command-line tool for pulling fields out of JSON files) before BloodHound ever sees it.
$ ls -la 2026*_*.json
-rw-rw-r-- 1 havoc havoc  4277 Aug  8 22:22 20260808222110_computers.json
-rw-rw-r-- 1 havoc havoc 20933 Aug  8 22:22 20260808222110_containers.json
-rw-rw-r-- 1 havoc havoc  3122 Aug  8 22:22 20260808222110_domains.json
-rw-rw-r-- 1 havoc havoc  3964 Aug  8 22:21 20260808222110_gpos.json
-rw-rw-r-- 1 havoc havoc 48050 Aug  8 22:21 20260808222110_groups.json
-rw-rw-r-- 1 havoc havoc  4817 Aug  8 22:21 20260808222110_ous.json
-rw-rw-r-- 1 havoc havoc  2836 Aug  8 22:21 20260808222110_users.json
Every file has the same envelope. This is the documented collector JSON format (version 5):
{
  "meta": { "type": "computers", "count": 1, "version": 5, "methods": 0 },
  "data": [ { "...one object per array element...": "" } ]
}
Checking all seven files with jq shows the shape of the domain:
$ for f in 2026*_*.json; do jq -c '.meta' $f; done
{"methods":0,"type":"computers","count":1,"version":5}
{"methods":0,"type":"containers","count":18,"version":5}
{"type":"domains","count":1,"version":5}
{"methods":0,"type":"gpos","count":2,"version":5}
{"methods":0,"type":"groups","count":33,"version":5}
{"methods":0,"type":"ous","count":3,"version":5}
{"methods":0,"type":"users","count":2,"version":5}
One domain, one computer (the DC), 33 groups, and only two user objects visible to this account. On a box this active that number itself is a finding: the domain hides its interesting users from LDAP enumeration.
The fields that build the graph
Each object in data carries the fields the graph is built from. A user object:
{
  "ObjectIdentifier": "S-1-5-21-...-2601",        // the node's primary key (SID)
  "Properties": { "samaccountname": "anderson.w", "enabled": true, "pwdneverexpires": true },
  "PrimaryGroupSID": "S-1-5-21-...-513",
  "Aces": [                                          // who has RIGHTS OVER this object
    { "PrincipalSID": "S-1-5-21-...-512", "RightName": "GenericAll", "IsInherited": false }
  ],
  "Sessions": { "Collected": true, "Results": [] }
}
💡 Two terms in that JSON do a lot of heavy lifting. A SID (Security Identifier, e.g.
S-1-5-21-...-2601) is Windows’ permanent internal ID for a user, group, or computer - names can change, SIDs never do, so the graph is keyed on them. The tail number is meaningful:-500is the built-in Administrator,-512is the Domain Admins group,-519Enterprise Admins. An ACE (Access Control Entry) is one line of “principal X is allowed to do Y to this object”; the whole list of them on an object is its ACL (Access Control List). BloodHound’s most dangerous edges are just ACLs read correctly.
Read these carefully, because they are the key to everything that follows:
Acesis inbound control: entries say who can do what to this object. AForceChangePasswordACE on user X by user Y becomes the edgeY -[:ForceChangePassword]-> X.LocalAdmins/RemoteDesktopUsers/PSRemoteUsers/DcomUsersare computer-local collections: on a Computer object, they becomeAdminTo,CanRDP,CanPSRemote,ExecuteDCOMedges from each listed principal to that computer.SessionsbecomesHasSession, with the caveat the official docs are explicit about: a collected session does not guarantee credential material is present, only that it is possible.
A jq pass over the users file immediately shows the contractor account:
$ jq -r '.data[] | "\(.Properties.samaccountname)  enabled=\(.Properties.enabled)
         pwdneverexpires=\(.Properties.pwdneverexpires // false)"' *_users.json
null  enabled=null  pwdneverexpires=false        <- the "Users" well-known group pseudo-user
anderson.w  enabled=true  pwdneverexpires=true
pwdneverexpires=true on a contractor account is a finding before any pathfinding.
And the money query, the DC’s local groups, straight from the JSON with no BloodHound at all:
$ jq -c '.data[0] | {name: .Properties.name,
    LocalAdmins: [.LocalAdmins.Results[]?.ObjectIdentifier],
    RemoteDesktopUsers: [.RemoteDesktopUsers.Results[]?.ObjectIdentifier],
    PSRemoteUsers: [.PSRemoteUsers.Results[]?.ObjectIdentifier]}' *_computers.json
{"name":"DC.DANGLINGTREE.HTB",
 "LocalAdmins":["...-500","...-519","...-512"],
 "RemoteDesktopUsers":["S-1-5-21-4220238332-57023728-1129110646-1106",
                       "S-1-5-21-4220238332-57023728-1129110646-1108"],
 "PSRemoteUsers":["S-1-5-21-4220238332-57023728-1129110646-1106",
                  "S-1-5-21-4220238332-57023728-1129110646-1108",
                  "S-1-5-21-4220238332-57023728-1129110646-2601"]}
Two things jump out, and both turn out to be the heart of the box: our contractor anderson.w (SID ending -2601) has PowerShell Remoting rights on the domain controller, and two unresolved SIDs (-1106 and -1108) hold both RDP and PSRemote rights there. Remember those; they come back in the graph analysis below.
💡 Unresolved SID = the data references an ID that never came with a name - a principal that exists in local groups but was never returned as a user object (hidden from listing, or deleted, or from a broken trust). Read it as “something lives here that I cannot see yet”, not as noise.
4. Uploading and verifying the ingest
Upload the zip via drag-and-drop onto the canvas, the Quick Upload button, or Administration > File Ingest:
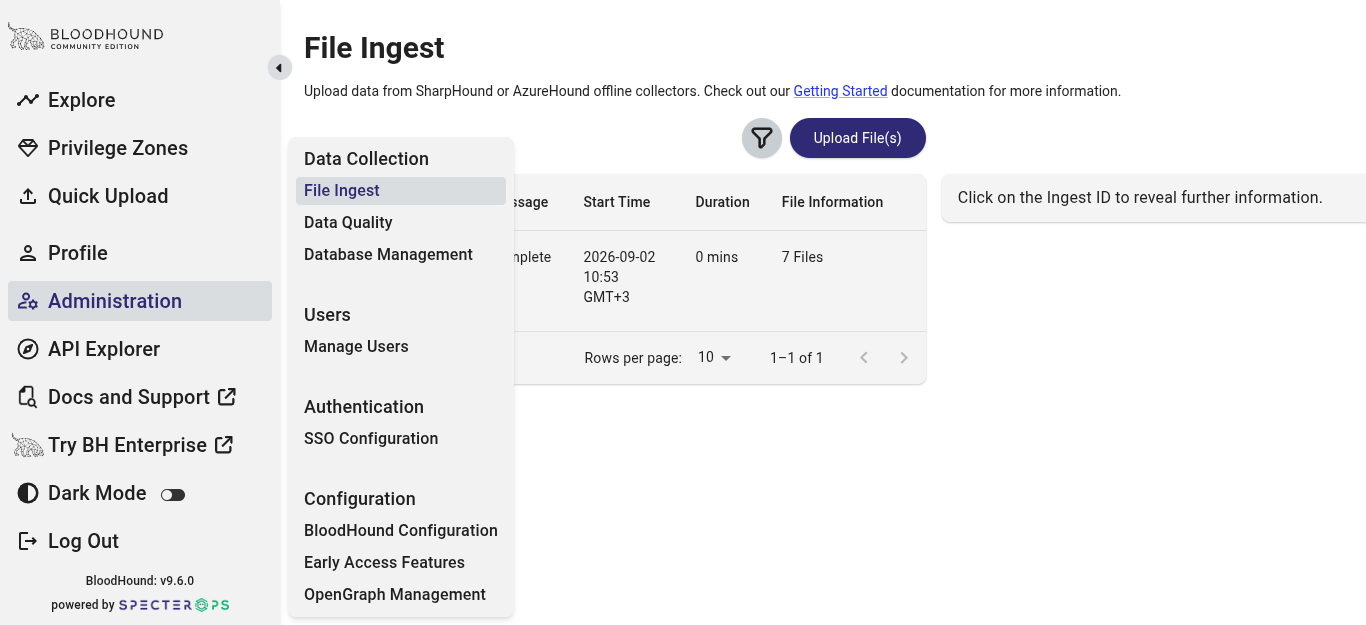
The ingest table shows the job ID, the uploading user, status (Complete), duration, and file count. If a collection silently produced nothing, this is the first place to look.
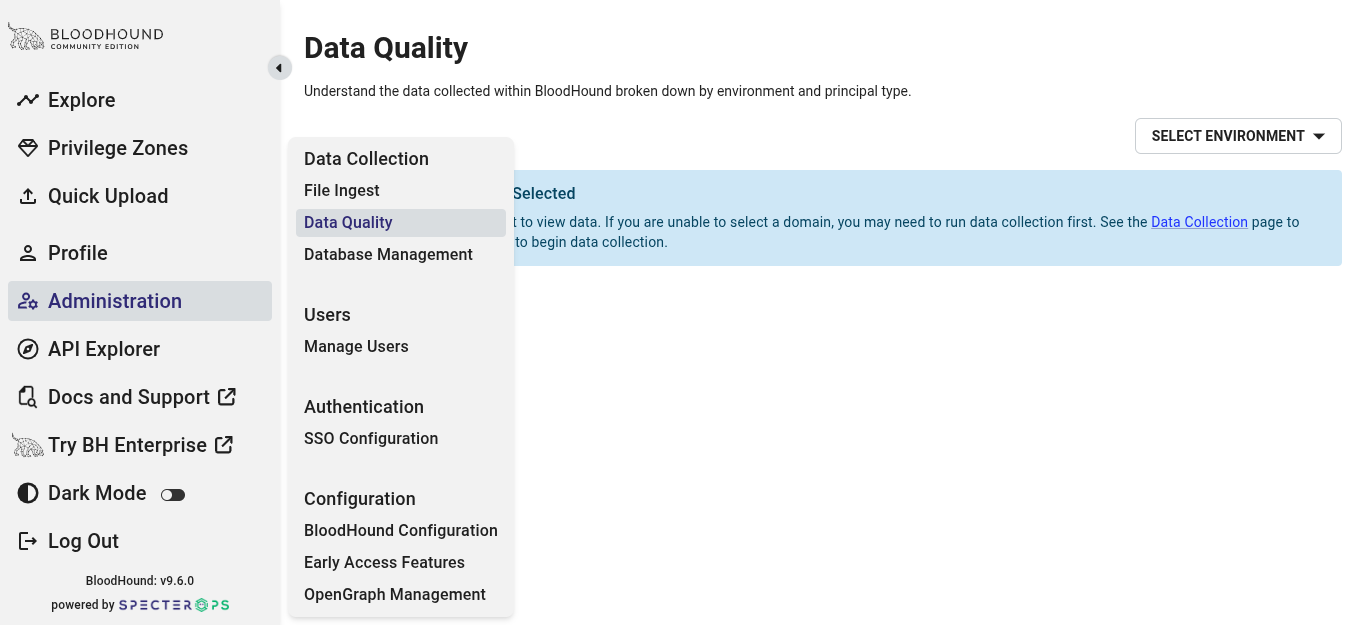
The Data Quality page (Administration > Data Quality) is the second verification stop: node counts by type. After my upload it looked sane (1 Computer, 1 Domain, dozens of Groups, some Containers). If your “Computer” count is zero after ingesting computer JSON, something is wrong, and section 6 below is about that exact failure.
You can verify the same thing from a terminal with cypher-shell (Kali’s Neo4j stack):
💡 cypher-shell is Neo4j’s command-line client - the same relationship queries the GUI runs, but in your terminal, which makes them easy to copy into reports or scripts.
-ais the database address,-u/-pyour Neo4j login, then the quoted string is the Cypher query.MATCH (n) RETURN ...means “grab every node and hand me back its label and a count” - a quick “what is actually in my graph?” sanity check.
$ cypher-shell -a bolt://localhost:7687 -u neo4j -p '<pw>' \
    "MATCH (n) RETURN labels(n)[0] AS type, count(*) AS count ORDER BY count DESC;"

type, count
"Group", 39
"Container", 18
"User", 4
"OU", 3
"GPO", 2
"Base", 2
"MigrationData", 1
"Computer", 1
"Domain", 1
And the edge census, which tells you which relationships actually made it into the graph:
$ cypher-shell ... "MATCH ()-[r]->() RETURN type(r) AS edge, count(*) AS count
                    ORDER BY count DESC;"

edge, count
"GenericAll", 105
"WriteOwnerRaw", 79
"WriteDacl", 79
"WriteOwner", 79
"OwnsRaw", 55
"Owns", 55
"GenericWrite", 50
"MemberOf", 10
"Contains", 8
"AddKeyCredentialLink", 4
"CanPSRemote", 3
"AllExtendedRights", 3
"GetChanges", 3
"GPLink", 2
"GetChangesAll", 2
"GetChangesInFilteredSet", 2
"CanRDP", 2
"CoerceToTGT", 1
Notice CanPSRemote: 3 and CanRDP: 2: exactly the five relationships we saw in the raw JSON a moment ago. Data verified end to end, terminal to GUI.
Clearing the graph between runs
Every upload adds to the graph; it never replaces what is there. That is a feature mid-engagement (re-collection from a new vantage point merges into the same picture), and a liability between engagements: two labs’ data stitched together produces phantom paths that exist in neither. Before starting a new lab or a new client’s collection, wipe the slate under Administration > Database Management > Clear Database (in CE this page also shows database size and lets you clear just the graph, just the audits, or everything).
The tell that you forgot: node counts in Data Quality that don’t match your collection, edges to principals you have never heard of, or “paths” that make no sense. Clear, re-upload, and the census above is your receipt that the graph now contains exactly one domain’s worth of truth.
5. Graph analysis in the GUI, click by click
Searching for a node
Back on Explore, the Search tab has a type-aware combobox. Type a few letters:
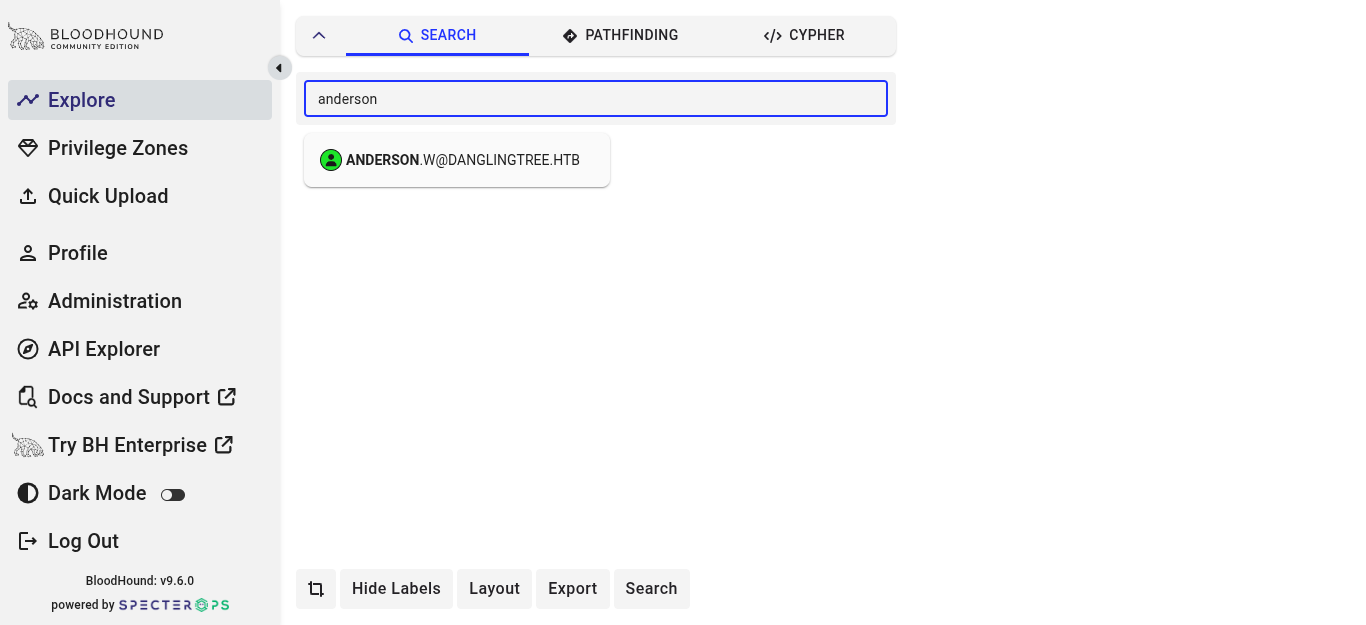
Pro tip visible in the placeholder text: prepend a type followed by a colon to search by type, e.g. user:bob. Clicking the result drops the node onto the canvas and selects it:
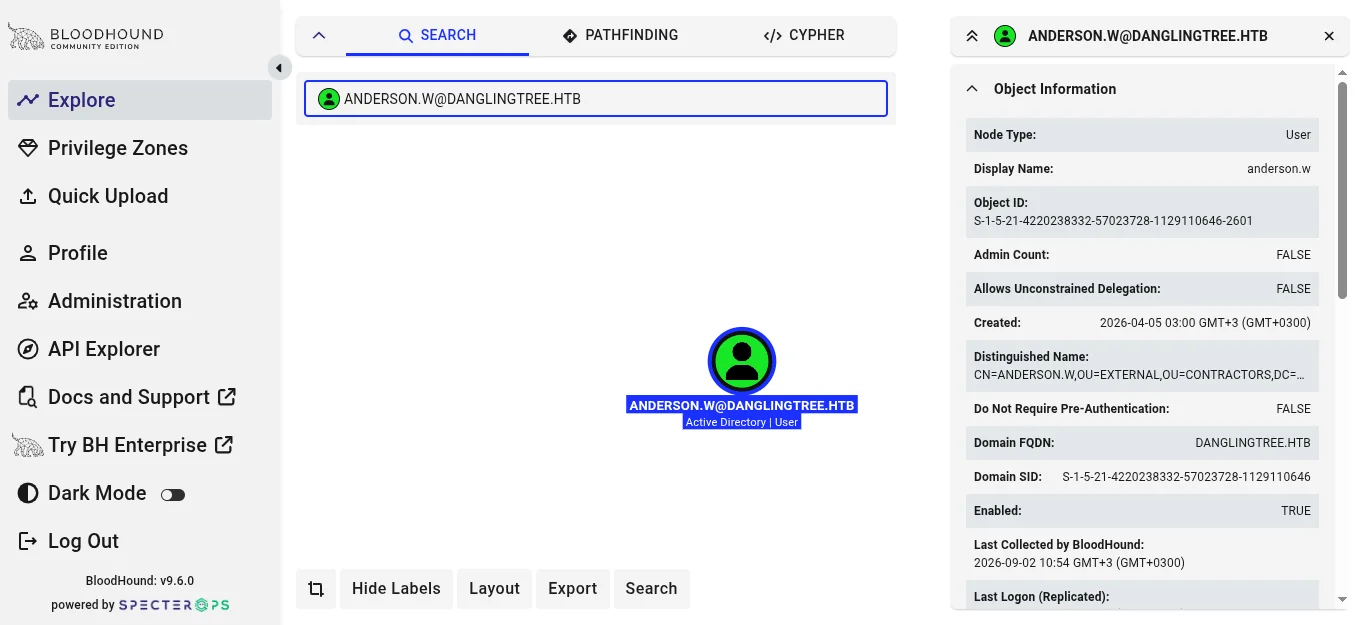
The node panel: the most underused screen in BloodHound
With a node selected, the right-hand panel opens. It is a full LDAP attribute view plus a summary of every relationship this object participates in. The Object Information block:
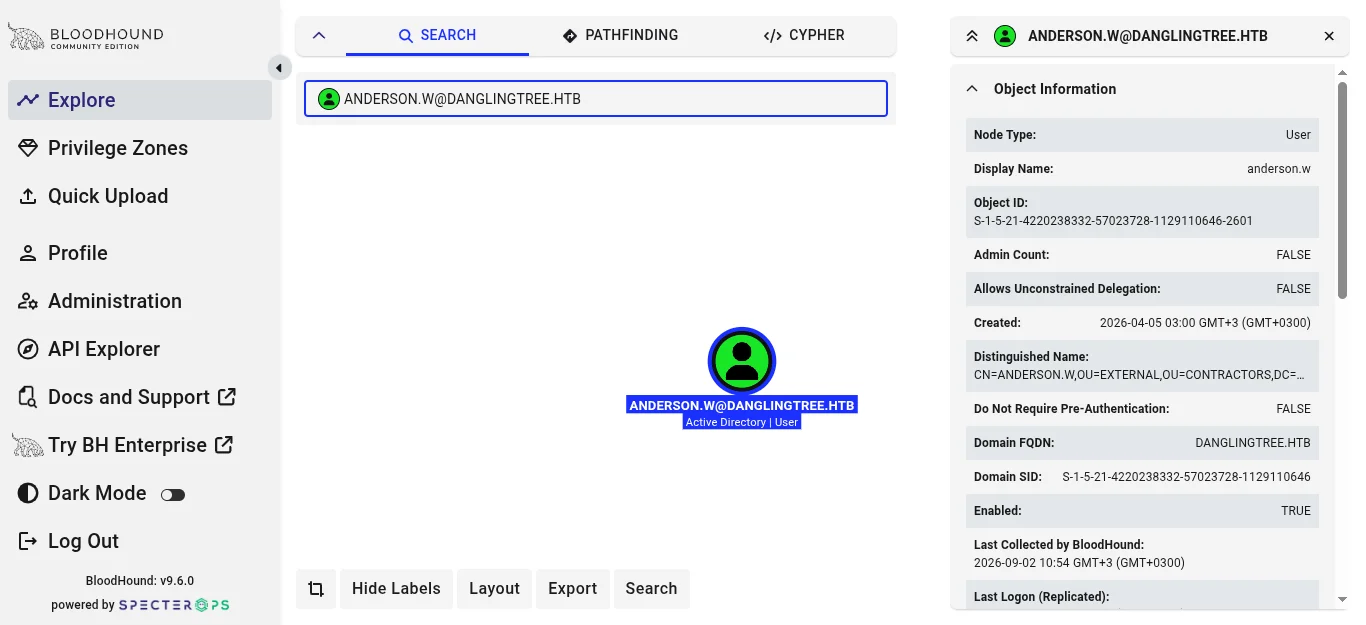
Everything here is a potential lead:
CN=ANDERSON.W,OU=EXTERNAL,OU=CONTRACTORS,DC=DANGLINGTREE,DC=HTB- a contractor, in the External OU- Password Never Expires: TRUE - a contractor account that never rotates
- Owner SID ending
-512(Domain Admins own the object)
Below the attributes, the panel breaks relationships into expandable sections, each with a count: Sessions, Member Of, Local Admin Privileges, Execution Privileges, Outbound Object Control, Inbound Object Control. Expanding Execution Privileges:
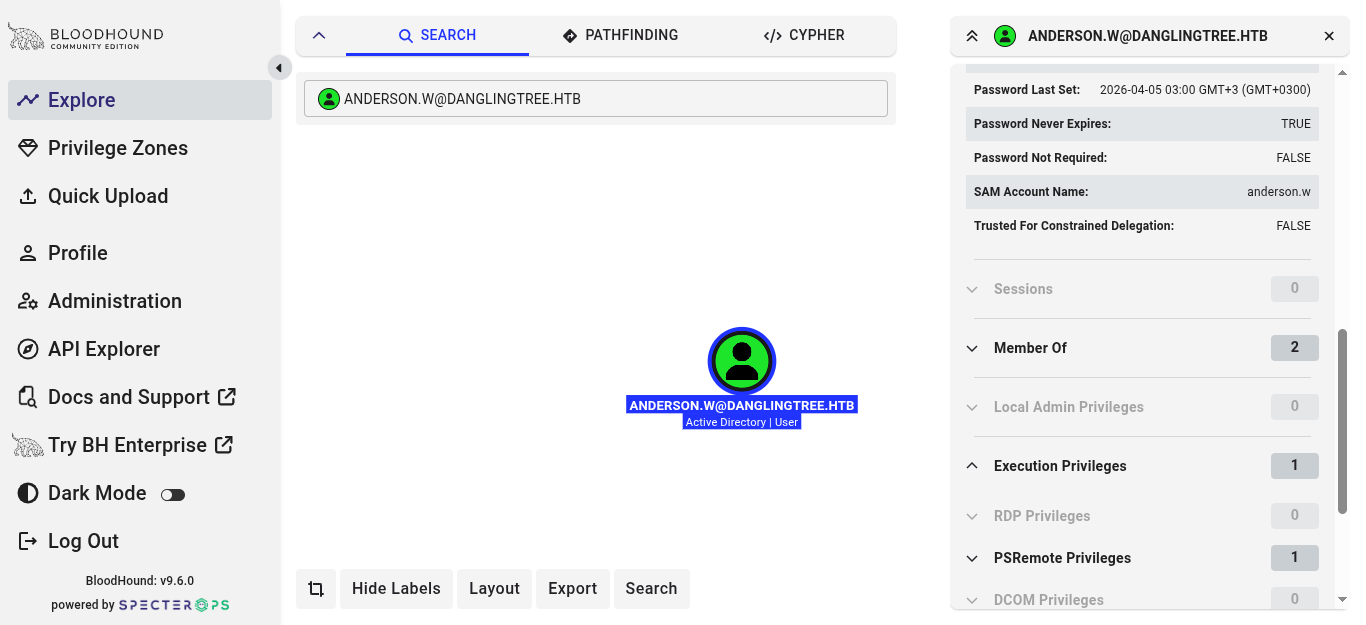
There it is in the GUI: anderson.w holds PSRemote (PowerShell Remoting) rights on DC.DANGLINGTREE.HTB, the same -2601 entry we found in the raw PSRemoteUsers JSON.
Expanding Inbound Object Control shows who controls us:
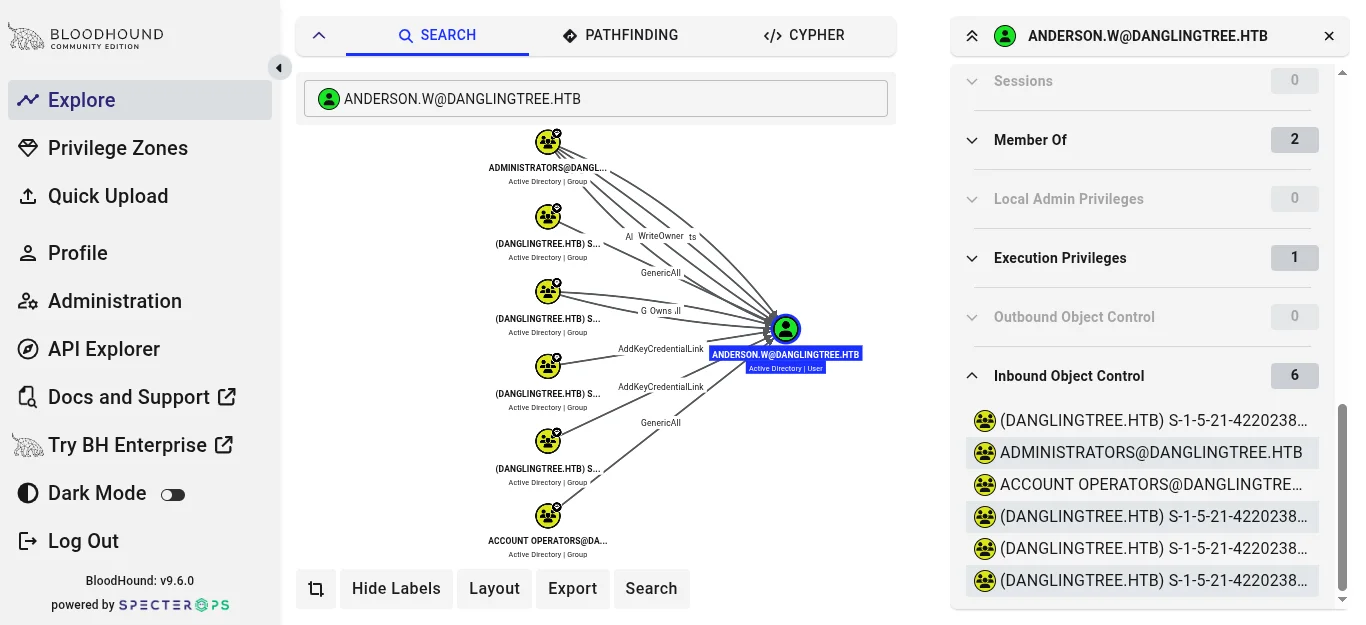
Six groups have rights over anderson.w: Domain Admins (-512), Administrators, Account Operators, and interestingly the Key Admins (-526) and Enterprise Key Admins (-527) groups, which hold AddKeyCredentialLink over the user. That edge is the “shadow credentials” primitive (attach a key credential to the object and authenticate as it with a certificate). Key Admins control is default on user objects, but it is worth knowing what it means.
Pathfinding: and the most important lesson
The Pathfinding tab is the famous feature: pick a start node and a destination node, and CE asks the backend for the shortest traversable path. I set start = ANDERSON.W and destination = the Domain Admins group (which on this box is named by its SID, S-1-5-21-...-512, because the DA group object was auto-created from ACE references rather than enumerated):
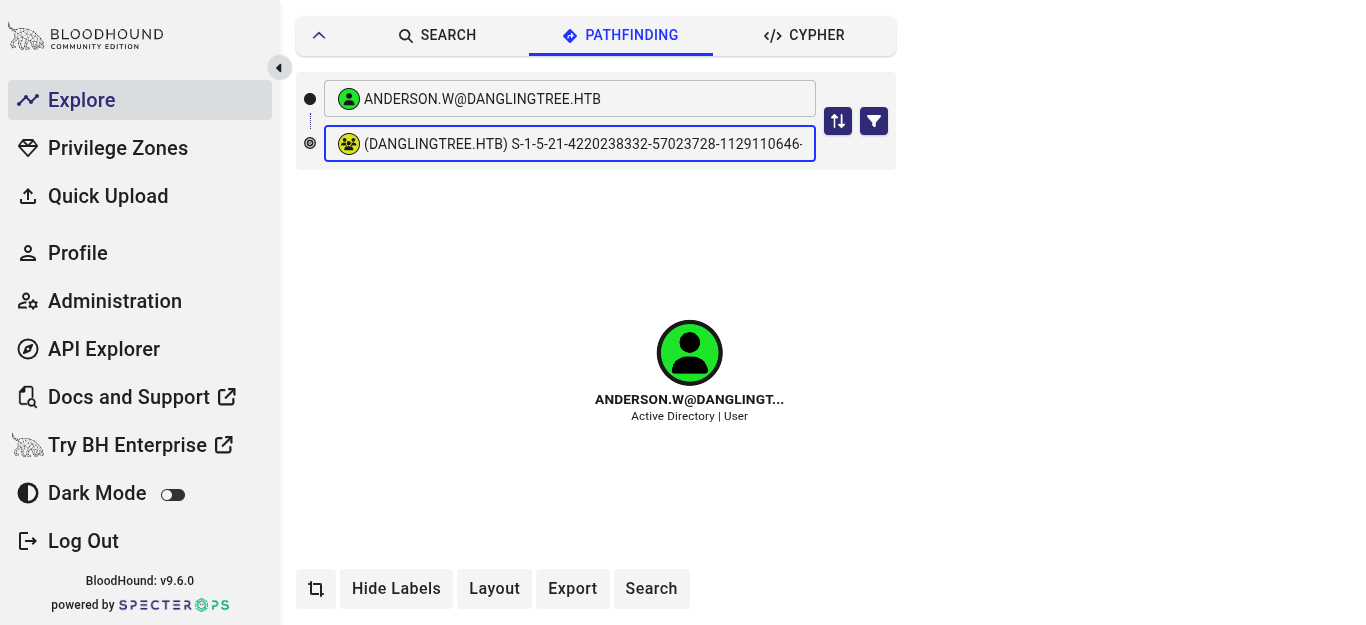
No path. The canvas stays empty and no error appears. Fun implementation detail: when no path exists, the CE API returns HTTP 404 on /api/v2/graphs/shortest-path. If you want proof it actually ran the query, open the browser console and look for the 404.
That is not a tool failure. It is the truth about this vantage point. The collection was taken as anderson.w, and anderson.w genuinely has no ACL or membership path to Domain Admins. The real chain on this box runs through things a single BloodHound snapshot cannot see: an application vulnerability (SmarterMail), a DPAPI blob in a user’s profile, and a certificate template that did not exist yet. BloodHound answers “given the relationships visible to this account, what can I reach?” It does not answer “what does the whole environment look like?” Only re-collection as each newly compromised user advances the picture.
Custom Cypher: the ghost SIDs
The best discovery of the session came from the Cypher tab. Local group data on the DC’s object showed principals that resolved to raw SIDs, accounts that exist in local groups but were never enumerated as user objects (the box hides them from LDAP listing). A one-line query surfaces them:
MATCH p = (u)-[r:CanRDP|CanPSRemote]->(c)
RETURN p
Reading that query left to right: MATCH p = finds a path and calls it p; (u) is any starting node; -[r:CanRDP|CanPSRemote]-> is a directed edge of type CanRDP or CanPSRemote; (c) is the node it points at; RETURN p draws whatever matched on the canvas. Plain English: “show me everyone who can remote-desktop or PowerShell-remote into anything.”
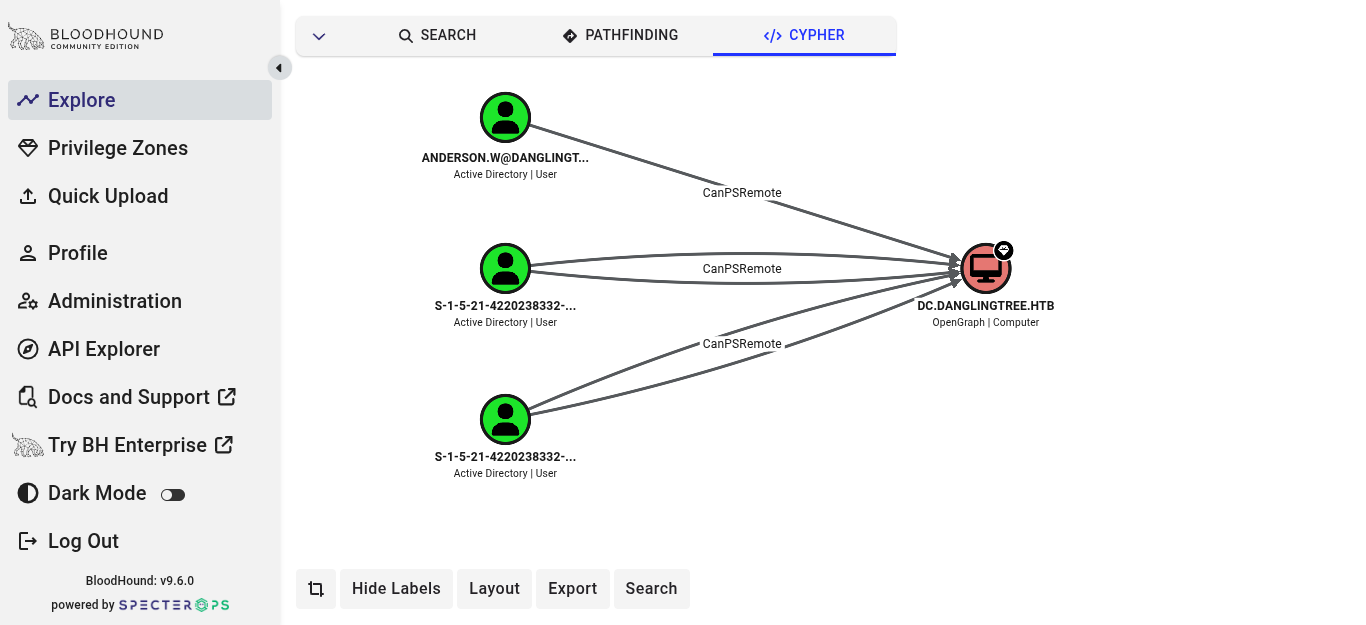
Result on the canvas: anderson.w plus two unresolved SIDs (...-1106, ...-1108), all holding RDP and PowerShell Remoting rights onto the domain controller. Unresolved SID nodes in BloodHound are a lead, not garbage: they tell you principals exist that your collection could not fully enumerate. On this box, those hidden identities are exactly the later-stage users the chain pivots through. They are also a classic defensive smell: SIDs in local groups with no matching user object often mean deleted accounts or broken trust plumbing.
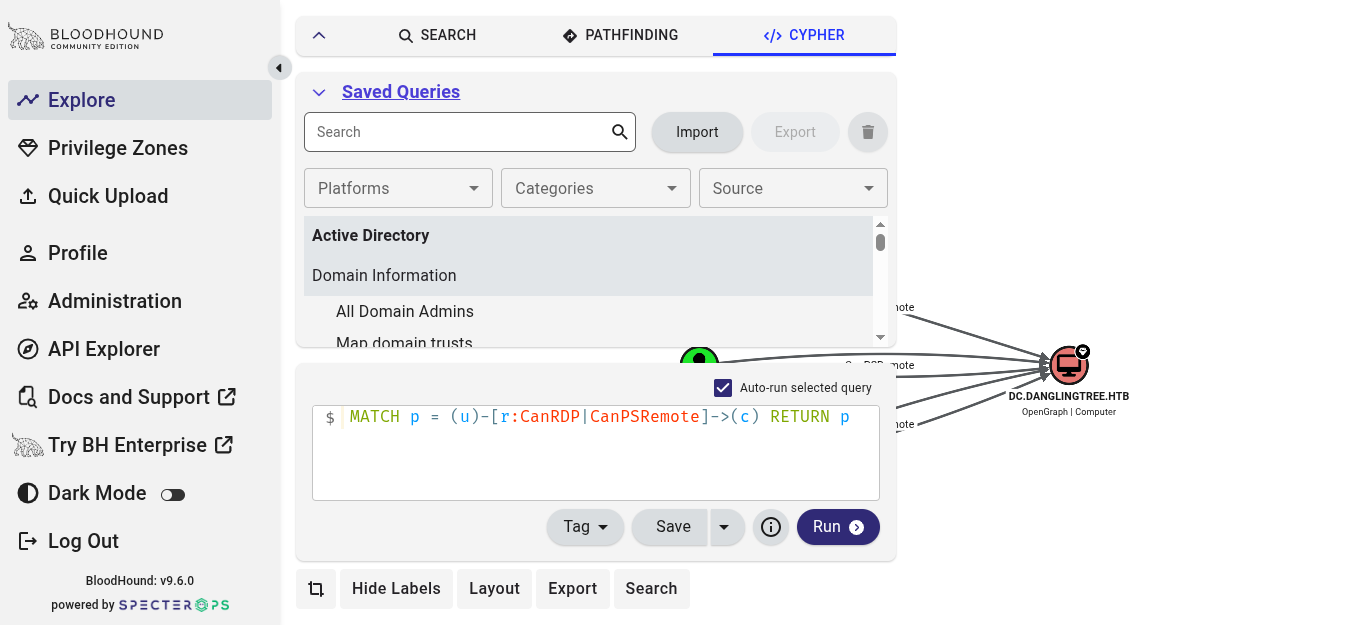
The Cypher tab also ships a Saved Queries drawer with the prebuilt analysis catalog (find domain admins, kerberoastable users, unconstrained delegation, and so on). This is the query library the button suggests; the official cloud version lives at queries.specterops.io.
The same queries from a terminal
Every GUI query has a terminal twin with the Kali/Neo4j stack:
$ cypher-shell -a bolt://localhost:7687 -u neo4j -p '<pw>' \
    "MATCH (u)-[r:CanRDP|CanPSRemote]->(c)
     RETURN u.name AS principal, type(r) AS edge, c.name AS computer
     ORDER BY edge, principal;"

principal, edge, computer
"ANDERSON.W@DANGLINGTREE.HTB", "CanPSRemote", "DC.DANGLINGTREE.HTB"
"S-1-5-21-4220238332-57023728-1129110646-1106", "CanPSRemote", "DC.DANGLINGTREE.HTB"
"S-1-5-21-4220238332-57023728-1129110646-1108", "CanPSRemote", "DC.DANGLINGTREE.HTB"
"S-1-5-21-4220238332-57023728-1129110646-1106", "CanRDP", "DC.DANGLINGTREE.HTB"
"S-1-5-21-4220238332-57023728-1129110646-1108", "CanRDP", "DC.DANGLINGTREE.HTB"
A few more from the standard triage set - each with what it is actually asking:
// Kerberoastable users (SPN set). Empty here: nothing to roast from this vantage.
$ cypher-shell ... "MATCH (u:User) WHERE u.hasspn = true RETURN u.name;"
(no rows)

// AS-REP roastable users (Kerberos pre-auth disabled). Also empty here.
$ cypher-shell ... "MATCH (u:User) WHERE u.dontreqpreauth = true RETURN u.name;"
(no rows)

// DCSync candidates: principals holding BOTH replication rights
$ cypher-shell ... "MATCH (n)-[:GetChanges|GetChangesAll]->(d:Domain)
                    WITH n, count(*) AS rights WHERE rights >= 2
                    RETURN n.name, rights;"
"ADMINISTRATORS@DANGLINGTREE.HTB", 2

// Shortest path from our user to Domain Admins
$ cypher-shell ... "MATCH p = shortestPath((u:User {name:'ANDERSON.W@DANGLINGTREE.HTB'})
                     -[*..10]->(g:Group))
                    WHERE g.objectid ENDS WITH '-512' RETURN p;"
(no rows)
💡 The vocabulary in those four, unpacked:
- Kerberoastable - a user account with an SPN (Service Principal Name, “this account runs service X on host Y”) has a password-derived ticket sitting on the network that anyone can request and then crack offline. Finding them = finding accounts whose passwords you can take home and brute-force at leisure.
- AS-REP roastable - kerberoasting’s lesser-known twin. Normally Kerberos requires pre-authentication: the client proves it knows the password before getting a ticket. Accounts with the “do not require pre-auth” flag (
dontreqpreauth) skip that proof - so anyone can walk up and request auth material for them outright, no service ticket needed, and crack it offline the same way. You can see the flag itself in the raw users JSON ("dontreqpreauth": falsefor anderson.w).- DCSync - the domain controller replication right. A principal holding both
GetChangesandGetChangesAllcan pretend to be a DC and ask a real one for the entire password-hash database. This is why the query counts principals with two rights, not one.- shortestPath((u)-[*..10]->(g)) - “walk up to 10 hops of any edges, from this user to this group, and return the shortest route found.” This is the Pathfinding tab in raw form.
The empty results are not dead ends; they are answers. Nothing is kerberoastable from this vantage, only default principals can DCSync, and there is no path to Domain Admins. All three verified facts narrow the attacker’s next move to exactly what the box actually requires: go find a new vantage point.
Getting data out
Export > JSON on any rendered graph gives you exactly what is on screen, nodes with full properties and edges with kinds, in one file. That is the bridge to reporting: screenshot for the executive summary, JSON for the appendix.
Here is a trimmed sample of what an export looks like - this is the anderson.w → DC graph from the screenshots above, with the long property lists cut down:
{
  "node_keys": ["name", "objectid", "enabled", "hasspn", "pwdlastset", "..."],
  "nodes": {
    "2": {
      "label": "ANDERSON.W@DANGLINGTREE.HTB",
      "kind": "User",
      "objectId": "S-1-5-21-...-2601",
      "isTierZero": false,
      "properties": {
        "distinguishedname": "CN=ANDERSON.W,OU=EXTERNAL,OU=CONTRACTORS,DC=DANGLINGTREE,DC=HTB",
        "enabled": true,
        "hasspn": false,
        "pwdneverexpires": true,
        "samaccountname": "anderson.w"
      }
    },
    "3": {
      "label": "DC.DANGLINGTREE.HTB",
      "kind": "Computer",
      "kinds": ["Computer", "Tag_Tier_Zero"],
      "isTierZero": true,
      "properties": {
        "operatingsystem": "WINDOWS SERVER 2025 STANDARD",
        "samaccountname": "DC$",
        "unconstraineddelegation": true
      }
    }
  },
  "edges": [
    { "id": "538", "source": "2", "target": "3", "label": "CanPSRemote", "kind": "CanPSRemote" },
    { "id": "541", "source": "69", "target": "3", "label": "CanRDP", "kind": "CanRDP" }
  ],
  "literals": []
}
Reading it: nodes is a dictionary of node-id → full object (every property the collector gathered lives under properties), edges references nodes by those same ids with a kind that matches the edge names you have been clicking all along, and literals holds standalone values used by some edges. Notice node 69 in the edges list never appears in nodes in the trimmed version - in the real export it is there as a raw SID label, which is the ghost-SID entry from earlier showing up in the data itself.
One property in that export deserves a flag of its own: the DC carries "unconstraineddelegation": true.
💡 Delegation is AD’s way of letting a computer or service act on a user’s behalf. With unconstrained delegation, the DC hands that computer a copy of any user’s ticket-granting-ticket when the user connects to it - “keep a set of everyone’s house keys in case you need to let yourself in.” If you compromise a machine with this flag (or can trick a privileged account into authenticating to it, e.g. via a printer coerce), you harvest those TGTs and replay them. Two related terms you will meet in the same dropdowns: LAPS (Local Administrator Password Solution, Microsoft’s scheme that gives every machine a unique, rotating local-admin password - the edge
ReadLAPSPassword, usually granted viaAllExtendedRights, hands it to you) and gMSA (group Managed Service Accounts, whose service-account passwords are retrievable by designated principals viaReadGMSAPassword). All three show up as plain properties or edges in exactly this export format.
Prioritizing what you find
A real graph returns dozens of findings at once. Rank before you chase - impact and blast radius first, credentials second, footholds third:
| Finding | Priority | Why |
|---|---|---|
DCSync rights, or GenericAll/Owns on the domain object | Critical | Direct dump of every hash in the domain - game over |
| Any path from your user to Domain Admins / Tier Zero | Critical | A full compromise chain, already drawn for you |
GenericAll/WriteDacl/WriteOwner/GenericWrite on a high-value user or the DC’s computer object | High | Take over the object, then the account or host it protects |
ReadLAPSPassword / ReadGMSAPassword-style secret reads | High | Plaintext or retrievable credentials, no cracking required |
| Kerberoastable or AS-REP roastable non-service accounts | Medium | Offline password cracking - worth it only if the password is weak |
CanRDP / CanPSRemote / ExecuteDCOM / AdminTo on servers | Medium | A foothold and lateral movement, but you still need something to do once inside |
HasSession on an admin’s workstation | Situational | The shortest chain in the graph when credentials are actually present in memory |
Two habits make triage systematic instead of scattershot. Walk the Users list one node at a time (search user: in the Search tab, or MATCH (u:User) RETURN u.name in Cypher) and check each one’s inbound control - that is how the ghost SIDs above were found, not by luck. And re-run the same ranked queries after every re-collection, so the diff between vantage points is what guides the next move, not a fresh avalanche of edges.
6. The gotcha: legacy collectors vs BloodHound CE
Here is where the session got genuinely educational. After uploading my zip, the graph looked fine, but two things were wrong:
- The DC, the domain, and all containers were typed as
Basenodes instead ofComputer/Domain/Container. Any prebuilt query filtering on:Computersilently returned nothing. - Every local-group edge was missing: no
CanRDP, noCanPSRemote, noAdminTo, despite that data sitting right there in the collector JSON.
You can even see the residue of this in the node census above: those two Base nodes are the leftovers. (The graph you have seen in screenshots from section 5 onward is after I repaired it, which is why Computer: 1 and Domain: 1 read correctly.)
The cause: Kali’s bloodhound-python package (1.9.0) is the legacy ingestor. It targets BloodHound 4.x. BloodHound CE compatibility lives in a separate fork and package: pip install bloodhound-ce, which installs a bloodhound-ce-python binary. The legacy JSON that CE accepts gets partial treatment: users and groups map cleanly, but untyped objects degrade to Base, and the computer local-group collections do not get converted into CE edges.
The practical guidance:
- On engagements, use a CE-native collector. SharpHound (download the matching version from Administration > File Ingest docs links), or
bloodhound-ce-pythonfrom Linux, or RustHound-CE if you want a static cross-platform binary with no .NET dependency. - If all you have is legacy JSON (as I did, the box was already retired), you can patch the graph in place. Labels are just Cypher:
MATCH (n:Base {name:'DC.DANGLINGTREE.HTB'})      SET n:Computer REMOVE n:Base;
MATCH (n:Base) WHERE n.objectid = 'S-1-5-21-...' SET n:Domain   REMOVE n:Base;
and the missing edges can be recreated from the JSON facts (the statements are mechanical: CREATE (a)-[:CanPSRemote]->(c) for each PSRemoteUsers entry). Do this only in a lab; on a real assessment, re-collect.
This is also why “collect once at the start and trust the graph forever” is a mistake: the collector version, the collection method, and the vantage account all shape the graph you are looking at.
7. BloodHound without BloodHound
The fastest way to understand a tool is to rebuild its core. The collector JSON is the graph, nodes and edge lists in plain sight. From there, BloodHound’s “shortest attack path” is a breadth-first search.
Here is the complete script - it loads every collector JSON in the working directory, rebuilds the node/edge tables from five passes over the data, prints an edge report with default admin noise filtered out, and finally BFS-searches from a starting principal toward the high-value targets. Run it as python3 bh_graph.py ANDERSON.W from the folder holding your collector zip’s contents:
#!/usr/bin/env python3
"""
BloodHound without BloodHound: rebuild the attack-path graph directly from
bloodhound-python collector JSON, then run a BFS shortest-path search to
high-value targets - the same thing the GUI does, in ~150 lines.

Usage: python3 bh_graph.py <start_name> [target_name]
"""
import json, glob, sys
from collections import defaultdict, deque

# High-value targets BloodHound marks by default
HV_SIDS = {
    "S-1-5-21-4220238332-57023728-1129110646-512": "DOMAIN ADMINS",
    "S-1-5-21-4220238332-57023728-1129110646-519": "ENTERPRISE ADMINS",
    "S-1-5-21-4220238332-57023728-1129110646-544" if False else
    "S-1-5-21-4220238332-57023728-1129110646-500": "ADMINISTRATOR",
}
# Edges derived from ACE rights -> (edge type, abusable?)
ACE_EDGES = {
    "GenericAll": True, "GenericWrite": True, "WriteDacl": True,
    "WriteOwner": True, "Owns": True, "ForceChangePassword": True,
    "AllExtendedRights": True, "AddMember": True, "AddSelf": True,
    "WriteSPN": True, "AddKeyCredentialLink": True, "DCSync": True,
    "ReadGMSAPassword": True, "ReadLAPSPassword": True, "AllowedToAct": True,
    "GetChanges": True, "GetChangesAll": True, "GoldenCert": True,
    "WriteAccountRestrictions": True,
}

nodes = {}          # sid -> (name, type)
edges = defaultdict(list)   # sid -> [(to_sid, edge_type)]  "principal controls target"

def add_node(sid, name, typ):
    if sid and name:
        nodes.setdefault(sid, (name.upper(), typ))

def add_edge(src, dst, etype):
    # src has RIGHT over dst  => control flows src -> dst
    if src and dst:
        edges[src].append((dst, etype))

def resolve(sid):
    if sid in nodes:
        return nodes[sid][0]
    if sid.endswith("-512"): return "DOMAIN ADMINS"
    if sid.endswith("-519"): return "ENTERPRISE ADMINS"
    if sid.endswith("-500"): return "ADMINISTRATOR"
    if sid.endswith("-516"): return "DOMAIN CONTROLLERS"
    if "S-1-5-32-544" in sid: return "BUILTIN ADMINISTRATORS"
    if "S-1-5-32-548" in sid: return "ACCOUNT OPERATORS"
    return sid

for f in glob.glob("2026*_*.json"):
    typ = f.rsplit("_", 1)[1].replace(".json", "")
    data = json.load(open(f)).get("data", [])
    for obj in data:
        sid = obj["ObjectIdentifier"]
        name = obj["Properties"].get("name") or obj["Properties"].get("samaccountname")
        node_type = {"users": "User", "computers": "Computer", "groups": "Group",
                     "domains": "Domain", "ous": "OU", "gpos": "GPO",
                     "containers": "Container"}.get(typ, "Base")
        add_node(sid, name, node_type)

        # 1. ACL-derived edges: Aces = rights OTHER principals have over THIS object
        for a in obj.get("Aces") or []:
            p, right = a["PrincipalSID"], a["RightName"]
            if right in ACE_EDGES:
                add_edge(p, sid, right)

        # 2. Group membership edges (member -> group)
        for m in obj.get("Members") or []:
            add_edge(m["ObjectIdentifier"], sid, "MemberOf*")

        # 3. Computer local groups: LocalAdmins -> AdminTo computer
        for key, etype in [("LocalAdmins", "AdminTo"), ("RemoteDesktopUsers", "CanRDP"),
                           ("PSRemoteUsers", "CanPSRemote"), ("DcomUsers", "ExecuteDCOM")]:
            col = obj.get(key)
            if col and col.get("Results"):
                for r in col["Results"]:
                    add_edge(r["ObjectIdentifier"], sid, etype)

        # 4. Sessions: user logged onto computer -> HasSession (edge computer -> user, info)
        for s in (obj.get("Sessions") or {}).get("Results") or []:
            add_edge(sid, s["ObjectIdentifier"] if isinstance(s, dict) else s, "HasSession")

        # 5. PrimaryGroupSid
        pg = obj.get("PrimaryGroupSID")
        if pg:
            add_edge(sid, pg, "MemberOf")

# ---- report ----
print(f"Loaded {len(nodes)} nodes, {sum(len(v) for v in edges.values())} control edges\n")

# Well-known admin principals: edges FROM these are default noise, not attack paths
NOISE_PRINCIPALS = {
    "S-1-5-21-4220238332-57023728-1129110646-512",  # Domain Admins
    "S-1-5-21-4220238332-57023728-1129110646-519",  # Enterprise Admins
    "DANGLINGTREE.HTB-S-1-5-32-544",                # BUILTIN Administrators
    "S-1-5-18",                                     # SYSTEM
}

print("=== Interesting control edges (excluding default admin noise) ===")
for src, outs in sorted(edges.items()):
    if src in NOISE_PRINCIPALS:
        continue
    for dst, etype in outs:
        s, d = resolve(src), resolve(dst)
        if s and d and etype != "MemberOf*":
            print(f"  {s:35s} --[{etype:20s}]--> {d}")

# ---- BFS shortest path ----
def find_start(name):
    name = name.upper()
    exact = next((s for s, (n, t) in nodes.items() if n == name), None)
    if exact:
        return exact
    # tolerate "ANDERSON.W" vs "ANDERSON.W@DANGLINGTREE.HTB"
    return next((s for s, (n, t) in nodes.items() if n.split("@")[0] == name), None)

def bfs(start_sid, targets):
    q, seen, parent = deque([start_sid]), {start_sid}, {start_sid: None}
    while q:
        cur = q.popleft()
        if cur in targets:
            path, n = [], cur
            while n:
                path.append(n); n = parent[n][0] if parent[n] else None
            return list(reversed(path)), parent
        for nxt, etype in edges.get(cur, []):
            if nxt not in seen:
                seen.add(nxt)
                parent[nxt] = (cur, etype)
                q.append(nxt)
    return None, parent

if __name__ == "__main__":
    start_name = sys.argv[1] if len(sys.argv) > 1 else "ANDERSON.W"
    start = find_start(start_name)
    if not start:
        print(f"\n!! node {start_name} not found"); sys.exit(1)

    # find any of the HV SIDs reachable
    path, parent = bfs(start, set(HV_SIDS))
    print(f"\n=== Shortest attack path: {start_name} -> high-value target ===")
    if not path:
        print("  No direct path in this collection (edges above are all that exist).")
    else:
        for i, sid in enumerate(path):
            etype = parent[sid][1] if parent[sid] else "(start)"
            print(f"  {resolve(sid):40s} via {etype}")
💡 How to read the script - the pieces map 1:1 to BloodHound concepts:
HV_SIDSis the “high-value target” flag BloodHound puts on Domain Admins, Enterprise Admins, and Administrator (the -512/-519/-500 SID tails from section 3).ACE_EDGESis the translation table from raw ACL rights to named attack-path edges: an ACE saying “principal X has WriteDacl on object Y” becomes an edgeX --[WriteDacl]--> Y.- The five numbered passes cover the five data sources in the collector JSON: ACLs (Aces), group members, computer local groups, sessions, and primary groups.
NOISE_PRINCIPALSis why default AD does not bury you: Domain Admins and BUILTIN Administrators hold hundreds of rights on built-in objects by design, so edges from them are wallpaper, not attack paths.bfs()is the Pathfinding tab: explore one hop at a time from your starting principal, remember how you reached each node, stop when you touch a high-value target, then walk the parent chain backwards to print the route.
Running it against the danglingtree collection:
$ python3 bh_graph.py ANDERSON.W
Loaded 60 nodes, 407 control edges

=== Interesting control edges (excluding default admin noise) ===
  S-1-5-21-...-1106  --[CanRDP      ]-->  DC.DANGLINGTREE.HTB
  S-1-5-21-...-1106  --[CanPSRemote ]-->  DC.DANGLINGTREE.HTB
  S-1-5-21-...-1108  --[CanRDP      ]-->  DC.DANGLINGTREE.HTB
  S-1-5-21-...-1108  --[CanPSRemote ]-->  DC.DANGLINGTREE.HTB
  ANDERSON.W@DANGLINGTREE.HTB  --[CanPSRemote]-->  DC.DANGLINGTREE.HTB
  ANDERSON.W@DANGLINGTREE.HTB  --[MemberOf    ]-->  S-1-5-21-...-513
  DOMAIN CONTROLLERS --[GetChangesAll]-->  DANGLINGTREE.HTB   (-> DCSync composite)
  ...

=== Shortest attack path: ANDERSON.W -> high-value target ===
  No direct path in this collection (edges above are all that exist).
The script reproduces everything the GUI told us: the anderson.w PSRemote edge, the ghost SIDs, the DCSync replication rights, and the absence of any path to Domain Admins. Same answer, in a form that diffs, scripts, and reports.
Two implementation notes worth keeping:
- Noise filtering matters. Default AD ships hundreds of
GenericAll/WriteDacledges from Domain Admins and BUILTIN\Administrators onto built-in objects (my run: 105 GenericAll edges, most of them wallpaper). Filter the well-known admin SIDs (-512, -519, -500, BUILTIN-544, SYSTEM) out before reading anything, or the interesting edges drown. - Membership direction:
Memberslists who belongs to a group, so the edge runs member -> group;Acesare the opposite direction (principal -> controlled object). Getting this backwards produces very confident, very wrong graphs.
8. What the case study teaches about attack paths
Mapping danglingtree’s actual chain onto BloodHound concepts:
| Chain step | BloodHound concept |
|---|---|
| anderson.w (contractor creds from a leaked PDF) | starting node; CanPSRemote onto the DC |
SmarterMail sysadmin reset -> svc_mail RCE | invisible: application layer, no AD relationship |
| noah.b -> DPAPI blob -> alex.o creds | invisible: credential material, not an edge |
| alex.o resets jake.h’s password | ForceChangePassword edge, would be visible if collected as alex.o |
| jake.h creates a vulnerable cert template | CreateChild on CN=Certificate Templates plus an ESC1 template; visible in CE with ADCS collection (CertServices/CARegistry methods) as ADCSESC1 |
| Administrator certificate -> DA | the ESC1 abuse path; CE models ESC1, 3, 4, 6, 9, 10, 13, and (as of 2026) ESC14 |
💡 Two terms in that table unpacked:
- DPAPI (Data Protection API) - Windows’ built-in secret vault. Browsers, Credential Manager, and many apps encrypt saved passwords with keys derived from the user’s own login password. If you compromise a user’s account or gain code execution as them, you can decrypt every secret they ever saved - that is the “DPAPI blob → alex.o creds” step: a stolen, encrypted credential cache cracked open, no AD edge involved.
- ADCS / ESC - Active Directory Certificate Services, the internal PKI that issues the certificates Windows uses instead of (or alongside) passwords for authentication. ESC1..ESC14 are the catalogued misconfiguration classes from the “Certified Pre-Owned” research: a badly-configured certificate template lets a normal user request a certificate that authenticates as someone powerful. An “ESC1” is therefore not an exploit bug but a config mistake that turns a certificate request into domain admin - which is exactly what jake.h’s crafted template set up.
Two takeaways. First: BloodHound’s blind spots are the non-AD relationships: applications, credential caches, and anything requiring an action you have not taken yet. Second: ADCS changed the game. Since the CE 5.x line, certificate templates are first-class graph citizens, and this box’s core trick, a CA publishing template names whose template objects do not exist (“dangling”, hence the machine name), is precisely the class of misconfiguration the CertServices collection surfaces. A DCOnly collection alone would not show it; the CA registry methods are what light up the ESC edges.
Re-collection discipline, then, is the real skill: collect as your first user, compromise one hop, collect again, and diff what the new vantage reveals. The graph is a narrative of your privileges, not a map of the world.
9. The defensive mirror
Everything above inverts cleanly for blue teams:
- Choke points and tiering: the highest-leverage defensive use of the same graph. Find the nodes that sit on the most shortest paths (CE’s Findings analysis does this automatically) and break edges there. Tier Zero tagging plus Privilege Zones (GA in CE 8.9) formalize it.
- PlumHound runs canned Cypher report suites against the database and emits HTML/CSV. “96% of 3000 users had a path to DA, average 4 hops” is a report executives act on.
- AD_Miner does similar audit reporting; Max combines graph analysis with password auditing.
- The same ghost-SID trick flips: SIDs in local groups that resolve to nothing are inventory debt. Attackers read them as leads; defenders should read them as cleanup tickets.
Quick reference - every command in this post
Copy-paste friendly, in the order you would actually run them. <placeholders> are yours to fill in; commands as shown worked on Kali (BloodHound CE 9.6.0 / bloodhound-python 1.9.0).
Lifecycle (section 2)
sudo apt install -y bloodhound neo4j   # one-time: install app + graph database
sudo bloodhound-setup                  # one-time: create DBs, start Neo4j
sudo bloodhound-start                  # every session: bring the UI up at :8080
sudo bloodhound-stop                   # every session end: shut both down
Collecting (section 3)
# Kali's legacy ingestor (see section 6 for the CE-native alternative)
bloodhound-python -u <user> -p '<password>' -d <domain> -dc <dc-host> -ns <dns-server> -c DCOnly --zip

# CE-native collector for engagements: pip install bloodhound-ce
bloodhound-ce-python -u <user> -p '<password>' -d <domain> -dc <dc-host> -ns <dns-server> -c DCOnly --zip

# NetExec: collect over LDAP when you already have creds (zip lands in ~/.nxc/logs/)
nxc ldap <dc-ip> -u <user> -p '<password>' --bloodhound --collection All --dns-server <dc-ip>
Start with DCOnly; escalate the collection method only when you need local groups/sessions and can afford the noise.
Inspecting collector JSON without BloodHound (section 3)
for f in *_*.json; do jq -c '.meta' $f; done        # per-file type + object counts
jq -r '.data[] | .Properties.samaccountname' *_users.json
jq -c '.data[0] | {name: .Properties.name,
    LocalAdmins: [.LocalAdmins.Results[]?.ObjectIdentifier],
    PSRemoteUsers: [.PSRemoteUsers.Results[]?.ObjectIdentifier]}' *_computers.json
Verifying the graph from a terminal (section 4)
cypher-shell -a bolt://localhost:7687 -u neo4j -p '<pw>' \
    "MATCH (n) RETURN labels(n)[0] AS type, count(*) AS count ORDER BY count DESC;"

cypher-shell -a bolt://localhost:7687 -u neo4j -p '<pw>' \
    "MATCH ()-[r]->() RETURN type(r) AS edge, count(*) AS count ORDER BY count DESC;"
Triage queries (section 5)
MATCH (u:User) WHERE u.hasspn = true RETURN u.name;              // kerberoastable
MATCH (u:User) WHERE u.dontreqpreauth = true RETURN u.name;       // AS-REP roastable
MATCH (n)-[:GetChanges|GetChangesAll]->(d:Domain) WITH n, count(*) AS rights
  WHERE rights >= 2 RETURN n.name, rights;                        // DCSync candidates
MATCH p = shortestPath((u:User {name:'<USER@DOMAIN>'})-[*..10]->(g:Group))
  WHERE g.objectid ENDS WITH '-512' RETURN p;                     // path to Domain Admins
BloodHound without BloodHound (section 7)
python3 bh_graph.py <start_name> # full script embedded in section 7FAQ
Is BloodHound still maintained in 2026? Legacy BloodHound (4.3.1) is archived. BloodHound CE is actively developed by SpecterOps; v9.6.0 shipped August 2026. Use CE.
Do I need Neo4j for BloodHound CE? Not anymore upstream: CE 8.x/9.x runs on PostgreSQL via the DAWGS library. Kali’s packaging still uses Neo4j for the graph. Functionally the Cypher you write is the same.
DCOnly or All collection? Start with DCOnly: it is the quietest and covers users, groups, ACLs, trusts, and GPOs. Escalate to Default/All only when you need local group and session data from member machines, and to LoggedOn only when you already have admin somewhere.
Why does BloodHound show no path when I expected one? Either there genuinely is no traversable relationship path from your vantage, your collection method did not gather the relevant data (DCOnly has no local groups or sessions), or you hit the legacy-vs-CE collector mismatch described in section 6.
How do I clear the graph between labs or engagements? Administration > Database Management > Clear Database. Uploads always merge into the existing graph, so two environments’ data will happily produce phantom paths across each other.
What are unresolved SID nodes in the graph? Principals referenced by ACLs or local groups that were never enumerated as objects. Treat them as leads (hidden identities, deleted accounts, broken trusts), and as cleanup tickets on the defensive side.
How do I get data out for a report? Export > JSON on any rendered graph, or script it with cypher-shell and turn saved queries into report generators (PlumHound does exactly this).
References
- BloodHound CE docs (setup, node and edge reference with per-edge Abuse/OPSEC pages): https://bloodhound.specterops.io/
- Official Query Library: https://queries.specterops.io/
- SharpHound: https://github.com/SpecterOps/SharpHound · bloodhound-ce (Python): https://pypi.org/project/bloodhound-ce/ · AzureHound: https://github.com/BloodHoundAD/AzureHound
- hausec’s BloodHound Cypher cheatsheet and CE query pack: https://hausec.com/2019/09/09/bloodhound-cypher-cheatsheet/ · https://github.com/hausec/Bloodhound-Custom-Queries
- Original research: “Introducing BloodHound” and “Six Degrees of Domain Admin” (posts.specterops.io, 2016); “Certified Pre-Owned” (Schroeder & Christel, Black Hat 2021); Certipy: https://github.com/ly4k/Certipy
- DAWGS (Postgres graph backend): https://github.com/SpecterOps/dawgs
- Defensive tooling: PlumHound https://github.com/PlumHound/PlumHound · AD_Miner https://github.com/AD-Security/AD_Miner

Comments